Tuesday, August 20, 2013

Glide Gear Slider Crude Test Shots


This week I received the Glide Gear slider and a ball head with a release plate from Amazon. Although I had created one of those DIY dolly slider on wheels(much thanks to The Frugal Filmmaker on YouTube), there was too much slack that created some wobble in my footage. It worked well enough on smooth surfaces but I needed something a bit more versatile so I chose the aforementioned combo.


DIY Dolly worked well but if you check closely, there was a good mount of wobble and this was my best take. 

The DMKFoto ball head with release plate attaches to the Glide Gear base plate without any adapters. After running some tests, I'm satisfied with the results. I get much cleaner shots but there is still a tiny amount of slack that will cause wobble. It will take a bit more practice and extra takes to make sure you get a smooth shot. Example below:


The clips with the dog is with the Sony HDR SR-11 that has optical image stabilization and the latter shots were with the GF2 with 20mm f1.7 that has no stabilization.

The Glide Gear slider is cheap but well built. I've heard it's self lubricating but I can imagine after a ton of use, spraying it with WD 40 from time to time won't hurt.

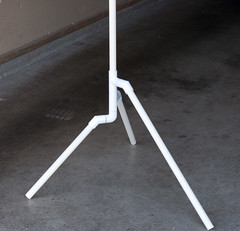
The thread in the center will fit the standard release plate so you can add a tripod. I was planning on adding a tripod on each end but the threading at each end was much larger than the threading in the middle.  Also, when I did attach my tripod in the middle, my tripod release plate had a bit of slack making it difficult to get good sliding shots. I then attached the slider to a light stand and it became more manageable. Most of the sliding shots will be low any way and the shots where I need some elevation, I wouldn't need to slide too much either so no worries.

I can't wait to use it on future projects. Particularly, I wanna replicate many of the tripod panning and tilting shots as well as the low sliding shots in this car video. It doesn't seem difficult to do. Hopefully, I can try that out soon.


Edit: Another Practice Slider Shots


Couldn't help it, a few more shots with the slider!

Thursday, August 15, 2013

Prenatal Yoga DVD

http://yogaalameda.com/

About a month ago, my Jiu Jitsu instructor asked me if I was interested in shooting a yoga DVD for his wife who's an excellent yoga instructor. I didn't hesitate and started preparing immediately. We could have shot much earlier but I had some issues with my lighting, particularly my new halogen soft box light kit malfunctioned (had to replace the switch).

The shoot lasted just under 3 hours which was a delight. I thought it would be at least 4 and not including the voice overs. I'll discuss my lighting and camera setup and other interesting notes if anyone else plans to shoot something similar. I should have snapped a photo with my phone to better explain but I forgot.


My lighting setup included a 750 watt halogen with an octagon soft box, a common 250 watt halogen work light, a clamp light with a cheap CFL bulb and those popular Neewer LED 160 lights(would not use as fill or main, only a rim light!)

screen grab from the DVD -black background caused gf2 to overexpose a bit and had to adjust in post. Maybe understand spot metering a bit more in my part. 

The soft box(main light) was camera right in this shot. It was about 12 feet away from the talent and stood about 8 feet from the ground and tilted down at the talent. Camera left was my work light(fill light). It was about 10 feet from the talent and with 1 sheet of parchment paper on a c-47(wooden clothes pin) to act as diffusion to soften the light. The clamp light(background light) was camera right, behind the talent just off camera, directed at the little Buddha statues. Further behind the talent camera right was my LED to act as a kicker. It stood on a make shift light stand made of PVC similar to this person's set up.


In retrospect, the only thing I would modify is to move the work light a couple feet close to the subject. For a future shoot, I might use a 500 watt work light as a fill than a 250 watt under similar conditions. If I shot in a smaller room, I'd change my light set up to run much cooler with a shit ton of CFL's instead since the halogens run super hot. 

My Panasonic GF2 with the SLR Magic 35mm T1.4 was directly in front of the subject. I kept the aperture around T2.8. It's difficult to dial in the focus on that lens with the GF2. It will be much easier when I get the Lumix G6 with focus peaking while magnified. My "B" camera was camera right of the GF2 but to the left of the soft box. The GF2 was in a fixed position using those baby tripods that sat on top of a box. The awesome "B" camera was the Sony Handycam HDR SR-11 on my cheap yet effective Targus fluid head tripod. 

Since I was doing multi cam and used an external audio source for certain scenes, I had to clap while all cameras and my Zoom H1 were recording to make sure I can sync all the files together in post. 


I shot this one man band style but for shoots like this or larger, I'd need to have a grip on hand to make life easier. 


Things to note before the first day of shooting: Right down lists of what you need to bring. A list for lighting gear like light stands, modifiers, the light itself, etc. Same for camera gear, audio gear, and misc. I'm glad I brought enough stingers(ext. cords) or I would have been fucked ha. 

Other things worth mentioning: Make sure the room noise is very quiet while recording audio. Even with a music track behind the audio, at times, you may hear cars passing by which is hard to eliminate or reduce in post, for me for that matter. Also make to recharge or have extra batteries on hand as well as extra bulbs in case any blow out. 

All in all, I had fun shooting the DVD. The editing portion was a bit more difficult since color correction is not my forte but I'm getting better. I don't have any crazy DVD software so I used a simple one that's included in my file converter called AVS Video Converter 8. The interface is simple and gets the job done. 

I have a camera slider coming in next week so I hope to shoot more videos! If anyone has any questions just leave a comment, thanks!!


Saturday, August 10, 2013

Family Portrait with the Sony Nex 3n + Sony E Mount 50mm 1.8

nice pic, off camera flash would have made it better

A friend asked if I was free Saturday just to pop off some portraits, nothing too crazy, just a few shots of his family. They decided to shoot at some hills close by and after scouting the location it was a no go. The background wasn't great and it was super windy.

I then suggested to shoot at a small park nearby that had a gazebo. That place ended up working a lot better for us. Even though I brought my Panasonic GF2, Panny 20mm 1.7  SLR Magic 35mm 1.4, my friend's Sony NEX 3 with his 50mm 1.8 worked out best for this particular situation.

My 20mm 1.7 shot wide open can give you very good shallow depth of field but not ideal for portraits. It will distort and even if you shoot a small group wide open it will not give you the shallow depth of field needed, for my satisfaction at least.  Maybe if I had an ND filter for the 20mm and used some light modifiers I could have made things work but alas it wasn't a hardcore photo shoot...which I don't mind doing now since it will up my technique. I also rationalize things by saying I'm mostly a video shooter or I don't have so n so equipment..

My 2nd option was my 35mm 1.4 which is a 70mm 35mm equivalent with the x2 crop factor for micro four thirds. This will get me the shallow DOF I need but since there were time constraints and a child that won't sit still, it would be very difficult for me to get the focus correct with the manual SLR Magic lens on my GF2(This would be no problem if I had the new Panasonic G6's focus peaking).

It was a good thing I told my friend to bring his camera or it would have been real rough just to get a handful of usable shots. I wasn't as efficient navigating through the Sony interface but I managed. Since the 50mm(75mm equivalent) is a long enough focal length for good portraits, I was able to get the shallow DOF I wanted and I didn't need to be fully wide open which allowed me to get sharper image in the center as well.

Overall, I was impressed with the old NEX 3n with the 50mm 1.8. I liked the sharp LCD and the quick enough auto focus. For a 300 dollar lens, I think it's a must have lens for portraits for any Sony NEX shooters if you are going to stick to native E mount lenses.

After I get the Lumix G6, that cheap but awesome Sigma 60mm 2.8 and a flash I can shoot off camera are next on my list. By then, I'd have the tools that would suit most situations.


white board used as a reflector here

couple shots back at the parent's place

back light from sun a little too strong, maybe flag that off a bit next time and use a larger aperture